前言 之前在 Flatcar 的系統擴充元件提了兩個 PRs ,讓 WasmEdge 與 LlamaEdge 能以 sysext 的方式在 Flatcar 被部署時,一起被安裝在裡頭。因為跟 DigitalOcean 發生了一些事,因此決定留下筆記以後,準備遷移到 Azure 或其他友善的平台。
本文將涵蓋:
如何建立屬於你的 Flatcar Sysext(系統擴充元件)。
如何在 DigitalOcean 上新增 Flatcar Container Linux 的客製化映像檔案。
如何在 DigitalOcean 上部署 Flatcar Container Linux。
如何執行 Wasm 的應用程式(利益揭露,我是 WasmEdge 的維護者)。
如何部署大語言模型(LLM)在 Flatcar Container Linux 上,使用 LlamaEdge 為例。(利益揭露,這個專案會編譯成 Wasm 格式,並執行在 WasmEdge 之上)。
為什麼選 Flatcar Container Linux? Flatcar Container Linux 是 CoreOS Container Linux 的後繼者,是一個專為容器化應用程式所設計的作業系統。它的特點是:
安全:無法使用套件管理系統進行修改,只能透過 sysext 進行擴充。
針對容器做最佳化:預設只有提供與執行容器相關的套件。減少安裝多餘套件導致被攻擊的機會增加。
方便的初始化設定:透過 Ignition 進行初始化設定,讓使用者可以在啟動時就完成想要的初始化設定,包含但不限於:啟動服務、在根檔案系統中建立檔案、重新格式化 /var 檔案系統、使用遠端的設定檔來取代原先的設定檔、新增使用者、修改內核參數等。
友人 H 表示:「上面太官腔了,說實話好嗎?」ψ(`∇´)ψ」
建立你的 Flatcar 系統擴充元件 (Sysext) Flatcar 官方提供了一個工具 sysext-bakery ,讓使用者可以建立自己的 sysext 。
以 WasmEdge 為例 整個腳本可以分為以下幾個部分:
設定 bash 的環境變數。
檢查參數是否正確,如果不正確就印出使用說明。
下載與安裝你需要的應用程式。在這個範例中,我們下載了 WasmEdge 的壓縮檔。
移動檔案到正確的位置,比如執行檔應放置於 /usr/bin/ 下,函式庫應放置於 /usr/lib/ 下等 。
執行 bake.sh 來建立 sysext。
1
2
3
4
5
6
7
8
9
10
11
12
13
14
15
16
17
18
19
20
21
22
23
24
25
26
27
28
29
30
31
32
33
34
35
36
37
38
39
40
41
42
43
44
45
46
47
48
49
50
51
52
53
54
#!/usr/bin/env bash set -euo pipefailexport ARCH="${ARCH-x86-64} " SCRIPTFOLDER="$(dirname "$(readlink -f "$0 " ) " ) " if [ $# -lt 2 ] || [ "$1 " = "-h" ] || [ "$1 " = "--help" ]; then echo "Usage: $0 VERSION SYSEXTNAME" echo "The script will download the WasmEdge release tar ball (e.g., for 0.14.1) and create a sysext squashfs image with the name SYSEXTNAME.raw in the current folder." echo "A temporary directory named SYSEXTNAME in the current folder will be created and deleted again." echo "All files in the sysext image will be owned by root." echo "To use arm64 pass 'ARCH=arm64' as environment variable (current value is '${ARCH} ')." "${SCRIPTFOLDER} " /bake.sh --help exit 1 fi VERSION="$1 " SYSEXTNAME="$2 " if [ "${ARCH} " = "amd64" ] || [ "${ARCH} " = "x86-64" ]; then ARCH="x86_64" elif [ "${ARCH} " = "arm64" ]; then ARCH="aarch64" fi rm -f "WasmEdge-${VERSION} .tar.gz" curl -o "WasmEdge-${VERSION} .tar.gz" -fsSL "https://github.com/WasmEdge/WasmEdge/releases/download/${VERSION} /WasmEdge-${VERSION} -ubuntu20.04_${ARCH} .tar.gz" rm -rf "${SYSEXTNAME} " mkdir -p "${SYSEXTNAME} " tar --force-local -xvf "WasmEdge-${VERSION} .tar.gz" -C "${SYSEXTNAME} " rm "WasmEdge-${VERSION} .tar.gz" mkdir -p "${SYSEXTNAME} " /usr/binmkdir -p "${SYSEXTNAME} " /usr/lib mv "${SYSEXTNAME} " /"WasmEdge-${VERSION} -Linux" /bin/wasmedge "${SYSEXTNAME} " /usr/bin/mv "${SYSEXTNAME} " /"WasmEdge-${VERSION} -Linux" /lib/* "${SYSEXTNAME} " /usr/lib/rm -r "${SYSEXTNAME} " /"WasmEdge-${VERSION} -Linux" "${SCRIPTFOLDER} " /bake.sh "${SYSEXTNAME} " rm -rf "${SYSEXTNAME} "
執行腳本 1 2 3 4 5 6 7 8 9 10 11 12 13 14 15 16 17 18 19 20 21 22 23 24 25 26 27 28 29 30 31 32 33 34 35 36 37 38 39 40 41 42 43 44 45 46 47 48 ./create_wasmedge_sysext.sh 0.14.1 wasmedge WasmEdge-0.14.1-Linux/lib/ WasmEdge-0.14.1-Linux/lib/libwasmedge.so.0 WasmEdge-0.14.1-Linux/lib/libwasmedge.so.0.1.0 WasmEdge-0.14.1-Linux/lib/libwasmedge.so WasmEdge-0.14.1-Linux/bin/ WasmEdge-0.14.1-Linux/bin/wasmedge WasmEdge-0.14.1-Linux/bin/wasmedgec WasmEdge-0.14.1-Linux/include/ WasmEdge-0.14.1-Linux/include/wasmedge/ WasmEdge-0.14.1-Linux/include/wasmedge/version.h WasmEdge-0.14.1-Linux/include/wasmedge/enum_types.h WasmEdge-0.14.1-Linux/include/wasmedge/enum.inc WasmEdge-0.14.1-Linux/include/wasmedge/enum_errcode.h WasmEdge-0.14.1-Linux/include/wasmedge/wasmedge.h WasmEdge-0.14.1-Linux/include/wasmedge/enum_configure.h WasmEdge-0.14.1-Linux/include/wasmedge/int128.h Parallel mksquashfs: Using 8 processors Creating 4.0 filesystem on wasmedge.raw, block size 131072. [==================================================\] 654/654 100% Exportable Squashfs 4.0 filesystem, gzip compressed, data block size 131072 compressed data, compressed metadata, compressed fragments, compressed xattrs, compressed ids duplicates are removed Filesystem size 25975.38 Kbytes (25.37 Mbytes) 31.16% of uncompressed filesystem size (83364.33 Kbytes) Inode table size 1930 bytes (1.88 Kbytes) 65.42% of uncompressed inode table size (2950 bytes) Directory table size 140 bytes (0.14 Kbytes) 56.91% of uncompressed directory table size (246 bytes) Number of duplicate files found 0 Number of inodes 10 Number of files 3 Number of fragments 1 Number of symbolic links 2 Number of device nodes 0 Number of fifo nodes 0 Number of socket nodes 0 Number of directories 5 Number of ids (unique uids + gids) 1 Number of uids 1 root (0) Number of gids 1 root (0) Created wasmedge.raw
最後會產生一個 wasmedge.raw 的 sysext 檔案。請把它放到一個能被存取到的網路空間,我們後續在部署的時候會用到它。
在 DigitalOcean 上新增 Flatcar Container Linux 的客製化映像檔案 由於 DigitalOcean 並沒有提供 Flatcar Container Linux 的映像檔案,因此我們需要自己建立一個客製化的映像檔案。Flatcar 的官方文件 。
下載你想部署的對應版本映像檔 Flatcar 官方的映像檔路徑為 https://<channel>.release.flatcar-linux.net/<arch>-usr/<version>/flatcar_production_digitalocean_image.bin.bz2,其中:
<arch> 為 amd64或arm64`<channel> 為 stable、beta、alpha 或 lts<version> 為你想要部署的版本號。
舉例而言,如果你想要部署 4081.2.0 版本、架構為 amd64 、且屬於穩定頻道的映像檔,你可以透過以下指令下載:
1 wget https://stable.release.flatcar-linux.net/amd64-usr/4081.2.0/flatcar_production_digitalocean_image.bin.bz2
上傳映像檔到 DigitalOcean 雖然官方說可以透過命令行來上傳映像檔,但我嘗試後發現他會一直卡住,不如透過網頁上傳穩定。
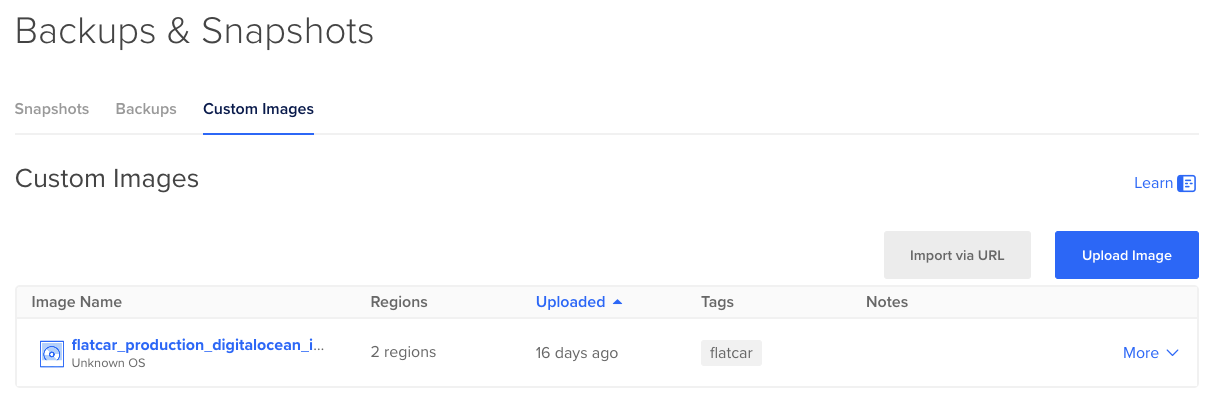
進入 Backups & Snapshots 頁面 客製化映像檔的管理頁面被藏在 Backups & Snapshots 頁面裏,點選 Custom Images 的分頁。
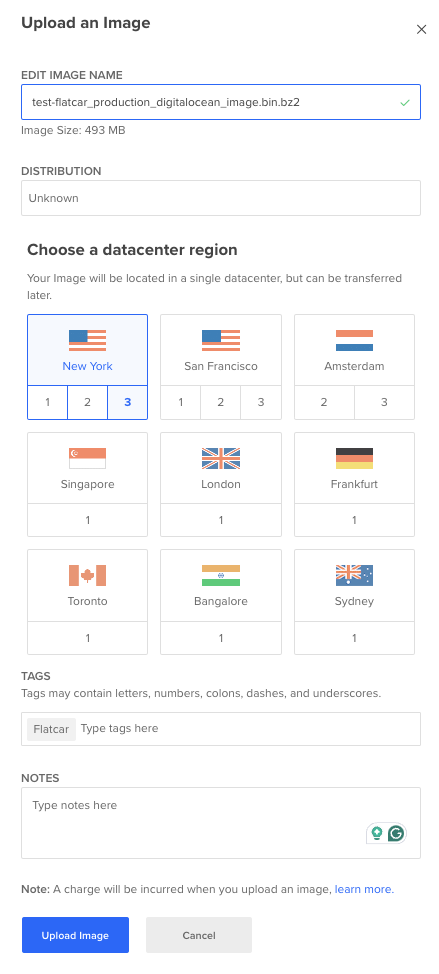
上傳映像檔 點擊 Upload Image 按鈕,選擇你下載的映像檔後,會跳出以下的表單,請填寫相關的訊息。
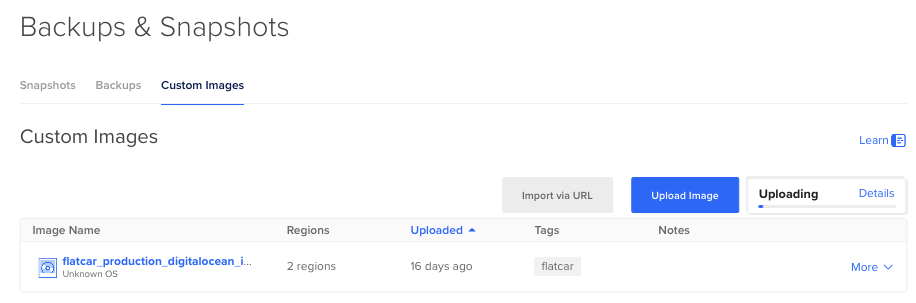
上傳中 上傳中,請耐心等待。
上傳完成後,會進入等待中 等處理完成,會出現以下畫面 至少有個區域可用,就能夠繼續後面的步驟囉。
在 DigitalOcean 上部署 Flatcar Container Linux 由於在網頁上的使用介面不直覺,後續步驟我們會透過 DigitalOcean 的 API 在命令行中來進行操作。
前置動作 在部署之前,有些環境變數需要先設定與取得。
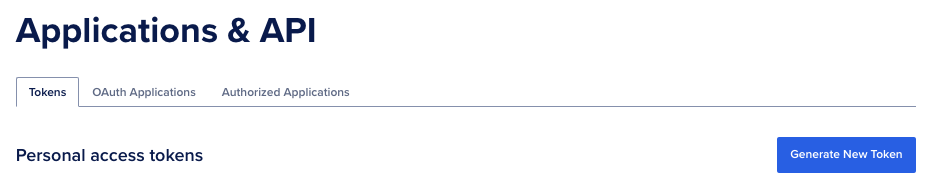
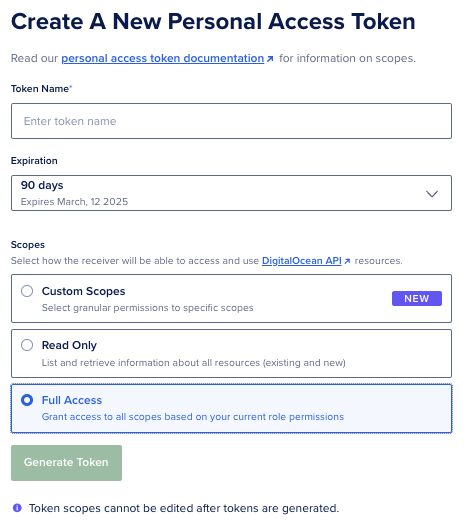
取得 Personal Access Token 到 Personal Access Token 頁面
點選 Generate New Token 按鈕
這邊請選擇要給該 Token 什麼權限,這邊恕我偷懶選了 Full Access,本文用完就撤銷了。
將 Personal Access Token 設定到環境變數 設定 SSH Key ID 請先使用網站上傳你的 SSH Key 或者使用 API 上傳 SSH Key,這個官方文件很詳細,請讓我跳過上傳的部分。
接著你需要取得已經上傳後的 SSH Key ID,這邊我們透過 API 來取得。
1
2
curl --request GET "https://api.digitalocean.com/v2/account/keys" \ --header "Authorization: Bearer $TOKEN "
SSH Key ID 在這邊 上面指令執行以後,會得到以下的輸出,id 的那組數字就是我們後續會用到的 SSH Key ID。
1
2
3
4
5
6
7
8
9
10
11
12
13
14
15
16
17
18
{ "ssh_keys" : [ { "id" : 12345678 , "public_key" : "ssh-ed25519 ..." , "name" : "..." , "fingerprint" : "..." } ] , "links" : { "pages" : { } } , "meta" : { "total" : 1 } }
將 SSH Key ID 設定到環境變數 取得映像檔 ID 在剛才上傳映像檔的時候,如果你有輸入 tag 的話,可以透過以下指令來取得映像檔 ID。
1
2
curl --request GET "https://api.digitalocean.com/v2/images?type=distribution&private=true&tag_name=flatcar" \ --header "Authorization: Bearer $TOKEN "
映像檔 ID 在這邊 裏頭的 id 就是我們需要的資訊。
1
2
3
4
5
6
7
8
9
10
11
12
13
14
15
16
17
18
19
20
21
22
23
24
25
26
27
28
29
30
31
{ "images" : [ { "id" : 123456789 , "name" : "flatcar_production_digitalocean_image.bin.bz2" , "distribution" : "Unknown OS" , "slug" : null , "public" : false , "regions" : [ "nyc2" ] , "created_at" : "2024-11-26T03:52:48Z" , "min_disk_size" : 7 , "type" : "custom" , "size_gigabytes" : 0.66 , "description" : "" , "tags" : [ "flatcar" ] , "status" : "available" , "error_message" : "" } ] , "links" : { "pages" : { } } , "meta" : { "total" : 1 } }
將映像檔 ID 設定到環境變數 建立 Droplet 準備設定檔案 請注意,Flatcar Linux 是不可修改的,因此需要在部署之初就透過 Ignition 來進行初始化設定。
WasmEdge 的範例 Ignition 的設定檔案 本質上就是把 wasmedge.raw 放入 /opt/extensions/ 下,並且建立一個連結到 /etc/extensions/wasmedge.raw。
請將以下設定檔存入 wasmedge.yaml 中。
1
2
3
4
5
6
7
8
9
10
11
12
variant: flatcar version: 1.0 .0 storage: files: - path: /opt/extensions/wasmedge-0.14.1-x86-64.raw mode: 0420 contents: source: https://github.com/second-state/flatcar-sysext-bakery/releases/download/0.0.1/wasmedge-0.14.1-x86-64.raw links: - target: /opt/extensions/wasmedge-0.14.1-x86-64.raw path: /etc/extensions/wasmedge.raw hard: false
轉換成 JSON 格式 1 cat wasmedge.yaml | docker run --rm -i quay.io/coreos/butane:latest > wasmedge.json
部署 Droplet 我選了相對便宜的機器 s-1vcpu-1gb,你可以根據需求選擇適合的機器。
1
2
3
4
5
6
7
8
9
10
11
12
curl --request POST "https://api.digitalocean.com/v2/droplets" \ --header "Content-Type: application/json" \ --header "Authorization: Bearer $TOKEN " \ --data '{ "region":"nyc3", "image":"' $IMAGE_ID '", "size":"s-1vcpu-1gb", "name":"core-5", "private_networking":true, "ssh_keys":[' $SSH_KEY_ID '], "user_data": "' "$(cat wasmedge.json | sed 's/"/\\" /g') " '" }'
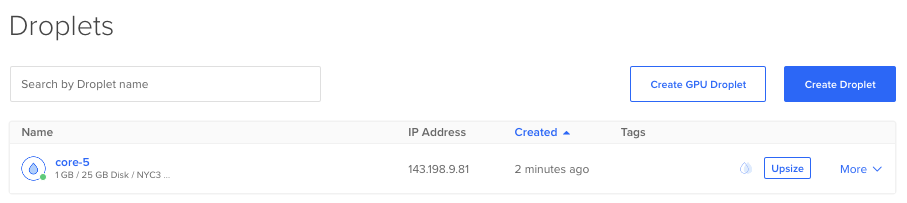
登入 Droplet 來到 Droplet 的頁面就能看到一台已經部署好的 Droplet 正在努力工作中。
使用 SSH 連線到 Droplet。
檢查是否有安裝成功 1 2 3 4 Flatcar Container Linux by Kinvolk stable 4081.2.0 for DigitalOcean core@core-5 ~ $ wasmedge --version wasmedge version 0.14.1 (plugin "wasi_logging" ) version 0.1.0.0
執行 Wasm 應用程式 1 2 wget https://github.com/second-state/flatcar-sysext-bakery/releases/download/0.0.3/hello_world.wasm wasmedge hello_world.wasm
預期的輸出:
1 Greeting from WasmEdge (=゚ω゚)ノ
到此就完成部署囉!
LlamaEdge 的範例 Ignition 的設定檔案 LlamaEdge 是執行在 WasmEdge 之上的,因此需要跟前一個範例一樣,先設定 WasmEdge
把 wasmedge.raw 放入 /opt/extensions/ 下,並且建立一個連結到 /etc/extensions/wasmedge.raw。/opt/extensions/ 下,並且建立一個連結到 /etc/extensions/llamaedge.raw。
請將以下設定檔存入 llamaedge.yaml 中。
1 2 3 4 5 6 7 8 9 10 11 12 13 14 15 16 17 18 19 variant: flatcar version: 1.0 .0 storage: files: - path: /opt/extensions/wasmedge-0.14.1-x86-64.raw mode: 0420 contents: source: https://github.com/second-state/flatcar-sysext-bakery/releases/download/0.0.3/wasmedge-0.14.1-x86-64.raw - path: /opt/extensions/llamaedge-0.14.16-x86-64.raw mode: 0420 contents: source: https://github.com/second-state/flatcar-sysext-bakery/releases/download/0.0.3/llamaedge-0.14.16-x86-64.raw links: - target: /opt/extensions/llamaedge-0.14.16-x86-64.raw path: /etc/extensions/llamaedge.raw hard: false - target: /opt/extensions/wasmedge-0.14.1-x86-64.raw path: /etc/extensions/wasmedge.raw hard: false
轉換成 JSON 格式 1 cat llamaedge.yaml | docker run --rm -i quay.io/coreos/butane:latest > llamaedge.json
部署 Droplet 我選了相對便宜的機器 s-1vcpu-1gb,你可以根據需求選擇適合的機器。
1 2 3 4 5 6 7 8 9 10 11 12 curl --request POST "https://api.digitalocean.com/v2/droplets" \ --header "Content-Type: application/json" \ --header "Authorization: Bearer $TOKEN " \ --data '{ "region":"nyc3", "image":"' $IMAGE_ID '", "size":"s-1vcpu-1gb", "name":"core-5", "private_networking":true, "ssh_keys":[' $SSH_KEY_ID '], "user_data": "' "$(cat llamaedge.json | sed 's/"/\\" /g') " '" }'
登入 Droplet 使用 SSH 連線到 Droplet。
下載模型 1 wget https://huggingface.co/second-state/Llama-3.2-1B-Instruct-GGUF/resolve/main/Llama-3.2-1B-Instruct-Q2_K.gguf
啟動 LlamaEdge API Server 1 2 3 4 5 6 7 8 9 10 11 12 13 MODEL_FILE="Llama-3.2-1B-Instruct-Q2_K.gguf" API_SERVER_WASM="/usr/lib/wasmedge/wasm/llama-api-server.wasm" PROMPT_TEMPLATE="llama-3-chat" CONTEXT_SIZE=128 MODEL_NAME="llama-3.2-1B" nohup wasmedge \ --dir .:. \ --nn-preload default:GGML:AUTO:${MODEL_FILE} \ ${API_SERVER_WASM} \ --prompt-template ${PROMPT_TEMPLATE} \ --ctx-size ${CONTEXT_SIZE} \ --model-name ${MODEL_NAME} &
送 Request 給 LlamaEdge API Server 1 2 3 4 curl -X POST http://localhost:8080/v1/chat/completions \ -H 'accept:application/json' \ -H 'Content-Type: application/json' \ -d '{"messages":[{"role":"system", "content": "You are a helpful assistant. Reply in short sentence"}, {"role":"user", "content": "What is the capital of Japan?"}], "model":"llama-3.2-1B"}'
預期的輸出:
1 2 3 4 5 6 7 8 9 10 11 12 13 14 15 16 17 18 19 20 21 22 { "id" :"chatcmpl-4a5a6487-3a47-4a79-86aa-0dd381dd71f7" , "object" :"chat.completion" , "created" :1734020512, "model" :"llama-3.2-1B" , "choices" :[ { "index" :0, "message" :{ "content" :"The capital of Japan is Tokyo." , "role" :"assistant" }, "finish_reason" :"stop" , "logprobs" :null } ], "usage" :{ "prompt_tokens" :32, "completion_tokens" :9, "total_tokens" :41 } }
若對 LlamaEdge 有更多興趣,請直接到該專案的 GitHub 頁面查看更多資訊。
謝謝大家的收看 :-)
寫在最後 謝謝朋友的關心,關於在 DigitalOcean 上發生的事情就是我想測試能不能也啟動 GPU 的 Droplet 來進行更有效能的 LLM 測試,可惜 DigitalOcean 拒絕了我。
以下為收到的原文,為避免該工作人員困擾,我將使用 XXX 取代人名:
1 2 3 4 5 6 7 8 9 10 11 12 13 14 15 16 17 18 19 20 21 22 23 24 25 Hello, Greetings from DigitalOcean! Thanks for reaching out, my name is XXX from DigitalOcean Support. After reviewing your account and your request, we are unable to approve access to GPU Droplets at this time for your team. We would be happy to consider your request for a higher resource limit after you have additional billing history on our platform. To provide additional context to what that means, invoices generate on the first day of every month and are based on the services consumed in the prior billing cycle. As invoices are generated and successfully paid using the payment method on file for your team, this generates billing history which is what we use to determine eligibility for resource limit increases. Should you have any questions or require further assistance regarding this request, please do not hesitate to reach out to us. Warm Regards, XXX Associate Customer Advocate DigitalOcean Support